

Enable or Disable Core Isolation and Memory Integrity in Windows 11/10
Cyber-attacks have changed over the past few years. Rogue hackers can now take over your PC and lock downwards files unless you are ready to pay them money. These types of attacks are chosen Ransomware, and they employ kernel-level exploits that endeavour to run malware with the highest privileges, e.m., WannaCry and Petya ransomware. In order to mitigate these types of attacks, Microsoft has rolled out a feature that allows you lot to enable Core Isolation and Memory Integrity to preclude such attacks.
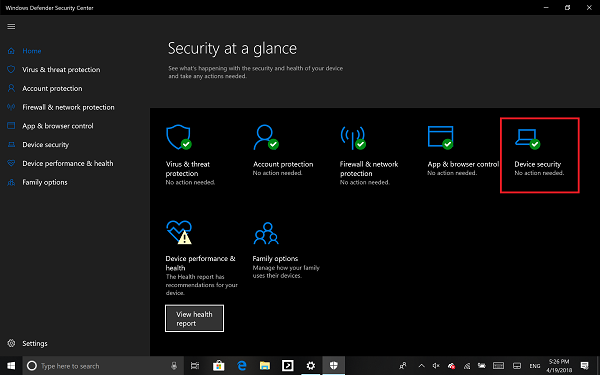
Windows Defender Security Centre offers this feature. Chosen Device Security, it offers status reporting and direction of security features built into your devices – including toggling features on to provide enhanced protection. Yet, It doesn't work on a software level; the hardware needs to support it besides. Your firmware should supportVirtualization, which enables the Windows 11/10 PC to run applications in a container, and then they don't get access to other parts of the arrangement.
Your device must encounter the requirements for standard hardware security This means your device should support memory integrity and core isolation and also have:
- TPM 2.0 (too referred to every bit your security processor)
- Secure boot enabled
- DEP
- UEFI MAT
Enable Core Isolation & Retentiveness Integrity in Windows 11
It is probably the easiest way to enable or disable Virtualization-based Security in Windows eleven. In other words, you need to enable Core isolation to go it done. For that, do the following:
- Search forwindows securityin the Taskbar search box.
- Click on the individual search result.
- Switch to theDevice security tab.
- Click on theCore isolation details pick.
- Toggle theRetentivity integritypush button to plow information technology on.
- Restart your computer.
Enable Core Isolation & Memory Integrity in Windows 11/x

- Sign in equally an administrator and open Windows Defender Security Centre
- Look for Device Security option.
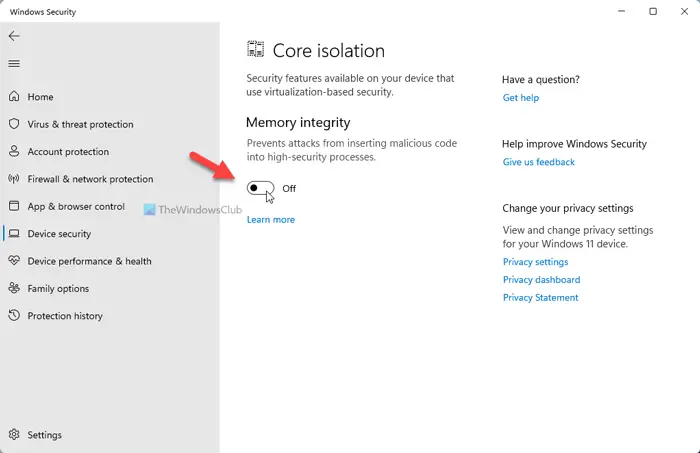
- Hither y'all should bank check if Core Isolation under Virtualization is enabled on your PC.
- Cadre isolation provides virtualization-based security features to protect core parts of your device.
- Click on Core isolation details, and you lot volition be offered to enable Retentivity Integrity.
Memory integrity (hypervisor-protected code integrity) is a security feature of Core isolation that prevents attacks from inserting malicious code into loftier-security processes. Toggle to plow it On.

Once enabled, information technology will ask yous to restart the PC to completely enable Retention Integrity.
If later, you lot confront application compatibility issues, y'all may need to turn this off.
Enable or Disable Core Isolation and Retentivity Integrity using Registry
Yous can likewise use the Registry, to enable or disable Core isolation Memory integrity using Registry Editor, follow these steps:
- Press Win+R to open the Run dialog.
- Type regedit and striking the Enter button.
- Click on the Yes option.
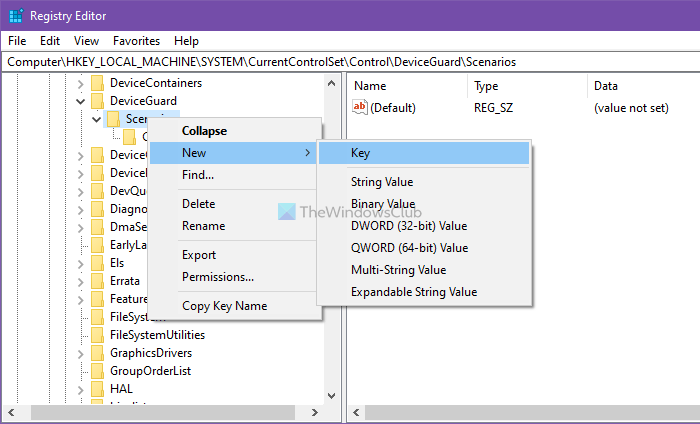
- Navigate to Scenarios in HKEY_LOCAL_MACHINE.
- Right-click on Scenarios > New > Primal.
- Name it as HypervisorEnforcedCodeIntegrity.
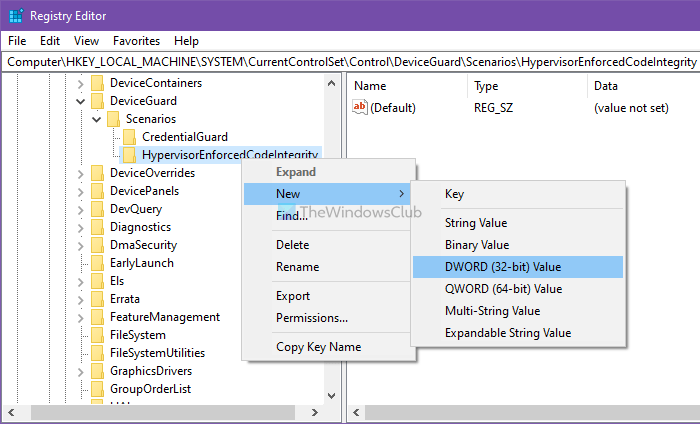
- Right-click on it > New > DWORD (32-bit) Value.
- Proper noun it as Enabled.
- Double-click on information technology to set up the Value data as 1 to enable and 0 to disable.
- Click the OK button.
- Restart your computer.
To learn more about these steps, keep reading.
Precaution: Before heading to the REGEDIT steps, don't forget to create a Organization Restore point.
To get started, press Win+R to open the Run dialog, blazon regedit, and hit the Enter button. If the UAC prompt appears on your screen, click on the Yes option to open the Registry Editor.
Side by side, navigate to the post-obit path:
HKEY_LOCAL_MACHINE\SYSTEM\CurrentControlSet\Control\DeviceGuard\Scenarios
Right-click on the Scenarios key > New > Key, and name it as HypervisorEnforcedCodeIntegrity.
Then, yous take to create a REG_DWORD value. For that, correct-click on HypervisorEnforcedCodeIntegrity > New > DWORD (32-bit) Value, and proper noun it as Enabled.
By default, information technology comes with a Value data of 0, meaning it is disabled. Even so, if y'all want to enable this functionality, double-click on information technology to set the Value data as 1.
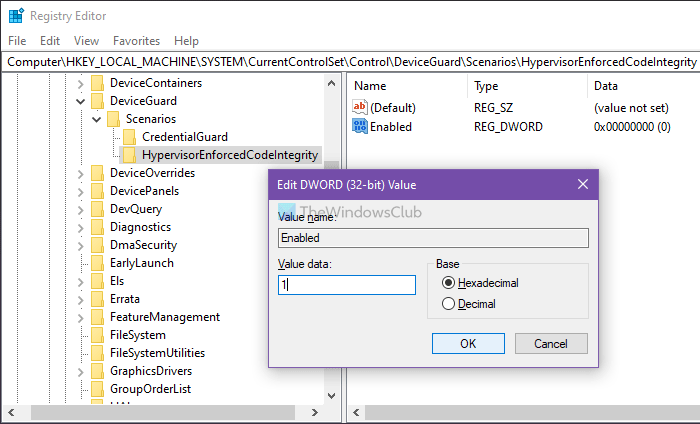
Click the OK button and restart your computer.
That said, there are ii more than options that might be available depending on the hardware of your PC.
- Security Processor only shows up if y'all have TPM available with your PC hardware. They are discrete fries soldered to a computer'south motherboard by the OEM. To get the most out of TPM, OEM must carefully integrate system hardware and firmware with the TPM to send information technology commands and react to its responses. The newer TPMs can also provide security and privacy benefits to the system hardware itself. So make sure to cheque for all of these if you are buying a new PC.
- Secure Boot prevents malicious lawmaking to load upward before your Bone. They are difficult to crack only with secure boot it's taken care of.
Windows 11/ten also offers Hypervisor Protected Code Integrity (HVCI) when you showtime with clean installs. Those who are on old hardware, will have the ability to opt-in mail service the upgrade using the UI in Windows Defender Security Eye (WDSC). This enhancement will ensure that the kernel process that verifies code integrity runs in a secure runtime environment.
Read: Virtualization-based Security not enabled in Windows 11.

Source: https://www.thewindowsclub.com/core-isolation-and-memory-integrity-in-windows-10
Posted by: millerdidettioners.blogspot.com
0 Response to "Enable or Disable Core Isolation and Memory Integrity in Windows 11/10"
Post a Comment